
How to Hook Up the Nest Thermostat? Easy Setup Guide
To hook up the Nest Thermostat, simply follow the installation guide provided by Nest, which includes connecting the thermostat to your Wi-Fi network and mounting it on your wall.
The Nest Thermostat offers a convenient and energy-efficient way to control the temperature in your home, allowing you to save money and reduce your environmental impact.
With its sleek design and intuitive interface, the Nest Thermostat is a popular choice for homeowners looking to upgrade their HVAC systems. By following the step-by-step instructions and using the Nest app, you can easily set up and start using your Nest Thermostat in no time.
Introduction To Smart Home Climate Control
The rise of smart thermostats has revolutionized home climate control, offering convenience and energy efficiency. One of the top choices in this category is the Nest Thermostat, known for its sleek design and user-friendly interface.
Choosing Nest brings a multitude of benefits, including the ability to remotely adjust the temperature, personalized scheduling, and energy usage insights. With its compatibility with various smart home systems, the Nest Thermostat seamlessly integrates into modern households, providing a seamless experience for users.
Before You Start: Compatibility Check
Before starting the installation, it’s important to check the compatibility of your HVAC system with the Nest Thermostat. Begin by identifying the type of HVAC system you have. You will need a few tools and materials for the installation process. Ensure that you have a screwdriver, a level, and a power drill on hand.
Additionally, gather wire labels, a pencil, and a ruler for labeling and marking. It’s also important to have a power drill and the necessary drill bits ready for use. Once you have confirmed the compatibility and gathered all the required tools and materials, you can proceed with the installation of the Nest Thermostat.
Unboxing The Nest Thermostat
When unboxing the Nest Thermostat, you’ll find the thermostat itself, a baseplate, screws and a screwdriver, and a Quick Start Guide. The thermostat has a sleek, modern design and a crisp display. The baseplate is used for easy installation, and the included screws and screwdriver make it simple to set up.
The Quick Start Guide provides clear, step-by-step instructions for getting started. Understanding the components is essential for a smooth installation process, ensuring that you have everything you need to hook up your Nest Thermostat correctly.
Credit: support.google.com
Removing Your Old Thermostat
Before installing your new Nest thermostat, you need to remove the old one. Safety should always come first, so the first thing you need to do is turn off the power to your HVAC system. This can be done by turning off the breaker or removing the fuse that controls your system. Once the power is off, you can safely detach the old unit from the wall.
Depending on the type of thermostat you have, you may need a screwdriver to remove the faceplate and access the wires. Carefully label each wire with the corresponding letter on your old thermostat, as this will help you when it comes time to install the Nest. Once you have all the wires labeled, gently pull them out of the wall and remove the old thermostat completely.
Installing The Nest Base Plate
To install the Nest base plate, first, choose the perfect location on the wall. It should be near an electrical outlet and an HVAC system. Use the built-in leveler to ensure that it is leveled properly. Then, drill holes to screw the base plate onto the wall. Make sure the holes are large enough to fit the wall anchors.
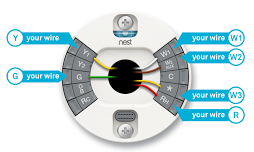
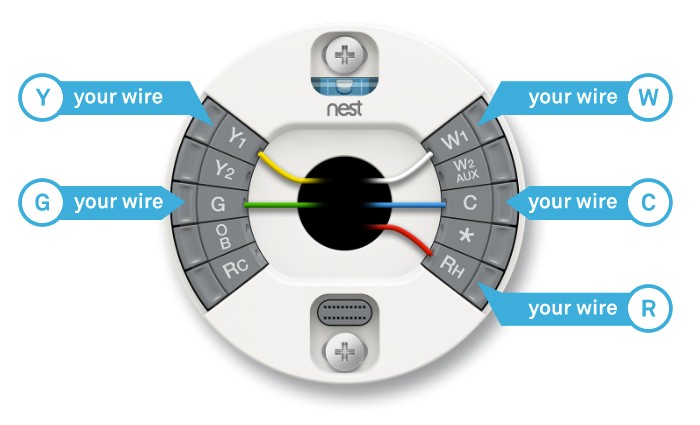
After positioning and securing the base, connect the wires to the Nest Thermostat. Use the wiring diagram provided by Nest to ensure that you connect the wires correctly. The wires should be pushed into the corresponding terminals and the screws tightened to secure them in place.
| Terminal Label | Wire Color |
|---|---|
| Rc | Red |
| W1 | White |
| Y1 | Yellow |
| G | Green |
Setting Up The Nest Thermostat
Attaching the Nest Thermostat display is a simple process. First, turn off the power to your heating and cooling system. Then, remove your old thermostat and place the Nest base plate onto the wall where the old thermostat was located. Use the screws provided to secure the base plate onto the wall.
Finally, snap the Nest display onto the base plate. To power up and complete the initial setup, turn the power back on and follow the instructions on the display. The Nest Thermostat will guide you through the setup process step by step.
Once the setup is complete, you can start enjoying the benefits of a smart thermostat, such as energy savings and remote control through your phone or voice assistant.
Configuring The Nest Thermostat
To hook up your Nest Thermostat, start by connecting it to your Wi-Fi network. This can be done through the Nest app on your phone or tablet. Once connected, you can then set your temperature preferences. This can be done manually or through the Nest’s learning feature, which will learn your preferred temperatures and adjust accordingly.
You can also set a schedule for your thermostat to follow, such as turning off when you leave the house and turning back on before you return. With these simple steps, you can have your Nest Thermostat up and running in no time!
| Step | Description |
|---|---|
| 1 | Connect your Nest Thermostat to your Wi-Fi network through the Nest app. |
| 2 | Set your temperature preferences either manually or through the Nest’s learning feature. |
| 3 | Create a schedule for your thermostat to follow. |
Credit: www.digitaltrends.com
Using The Nest App For Enhanced Control
When it comes to using the Nest App, the first step is downloading the app from the App Store or Google Play Store. After installation, pair your device with the thermostat using the app.
This will enable you to explore app features such as setting schedules, adjusting temperatures remotely, and receiving energy usage reports. The app provides enhanced control and convenience for managing your Nest Thermostat.
Troubleshooting Common Installation Issues
When setting up your Nest Thermostat, you may encounter various Wi-Fi connectivity problems. If this occurs, ensure that the thermostat is within range of your Wi-Fi network and that the network is functioning properly. Additionally, check for any interference from other electronic devices that could disrupt the connection.
If you experience incorrect temperature readings, verify that the thermostat is installed away from heat sources or drafts that could impact its performance. Wiring errors are another common issue.
Make sure that the wires are correctly connected to the corresponding terminals on the thermostat and that they have a secure connection. If you encounter any problems, consult the Nest installation guide for wiring errors and solutions.
Maintaining Your Nest Thermostat
When it comes to maintaining your Nest Thermostat, it is important to ensure regular updates are installed. This will guarantee that your thermostat is running on the latest software, providing optimal performance. In addition, cleaning and care are crucial to keep your Nest Thermostat in top condition.
It is recommended to gently wipe the thermostat with a soft, dry cloth to remove any dust or debris. Avoid using any cleaning solvents or liquids, as they may damage the device. By following these simple steps, you can ensure that your Nest Thermostat functions efficiently and effectively.
Maximizing Energy Savings With Nest
To maximize energy savings with the Nest Thermostat, take advantage of its learning features. The thermostat is designed to adapt to your schedule and preferences, so it’s important to utilize these capabilities. By allowing the Nest to learn your desired temperature settings and patterns, you can optimize energy usage throughout the day.
Another valuable feature is the ability to monitor energy history. This allows you to track your energy consumption and identify areas where you can make adjustments to further reduce your energy usage. By reviewing this data, you can gain insights into your energy habits and make informed decisions to save even more.
In summary, by using the learning features and monitoring your energy history with the Nest Thermostat, you can maximize your energy savings and contribute to a more sustainable lifestyle.

Credit: thenomadstudio.com
Expanding Your Smart Home Ecosystem
Expand your smart home ecosystem by hooking up the Nest Thermostat with compatible devices. By integrating your thermostat with other smart home devices, you can create automated routines that enhance your home’s efficiency and convenience.
Compatible devices, such as smart lights, plugs, and locks, can be synchronized with your Nest Thermostat to work together seamlessly. For example, you can set up a routine that automatically adjusts the temperature when you leave the house, ensuring energy savings. Additionally, you can sync your thermostat with smart lights to turn them off when you’re away, or with smart plugs to control appliances remotely.
With the Nest Thermostat as the hub of your smart home, you can enjoy the benefits of a fully connected and automated living space. Take advantage of the compatibility of the Nest Thermostat with various devices to create a personalized and efficient smart home experience.
Conclusion: Embracing The Future Of Home Automation
The Nest Thermostat is a revolutionary device that brings the future of home automation to your fingertips. With its easy installation process and user-friendly interface, you can quickly hook up the Nest Thermostat in your home and start enjoying its numerous benefits.
Recapping the benefits, the Nest Thermostat allows you to control and adjust your home’s temperature from anywhere using your smartphone. It learns your preferred temperature settings and creates a personalized schedule to optimize energy efficiency. This not only saves you money on your energy bills but also reduces your carbon footprint.
Looking ahead, the Nest Thermostat continues to evolve with new features and integrations, making it an essential component of a smart home ecosystem. From voice control to integration with other smart devices, the possibilities are endless.
Embrace the future of home automation by hooking up the Nest Thermostat and experiencing the convenience, comfort, and energy savings it offers.
Frequently Asked Questions
How Do I Connect My Nest Thermostat To My Home?
To connect your Nest thermostat to your home, follow these steps: 1. Download and install the Nest app on your smartphone or tablet. 2. Create a Nest account and sign in. 3. Follow the app’s instructions to add your thermostat to your account.
4. Connect your thermostat to your home’s Wi-Fi network. 5. Once connected, you can control your thermostat from the app or directly on the device.
What Wires Are Needed To Connect Nest Thermostat?
To connect a Nest thermostat, you typically need a common wire (C wire) for power, as well as wires for heating (W), cooling (Y), fan (G), and sometimes a second stage of heating or cooling (W2 or Y2). The specific wires required may vary depending on your HVAC system.
How Do I Connect My Nest To My Hvac?
To connect your Nest to your HVAC system, follow these steps: 1. Turn off the power to your HVAC system. 2. Remove your old thermostat and label the wires. 3. Connect the labeled wires to the corresponding terminals on the Nest base.
4. Attach the Nest display to the base and turn the power back on. 5. Follow the on-screen instructions to complete the setup.
Does A Nest Thermostat Need To Be Wired?
Yes, a Nest thermostat needs to be wired for power and connectivity to your HVAC system. It requires a common wire for a consistent power supply. Proper wiring is essential for the thermostat to function effectively.
Conclusion
Hooking up the Nest Thermostat is a straightforward process that can greatly improve your home’s energy efficiency and comfort. By following the step-by-step instructions provided in this blog post, you can easily install and set up the Nest Thermostat, allowing you to control your home’s temperature with ease.
With its smart features and user-friendly interface, the Nest Thermostat is a valuable addition to any household. Start enjoying the benefits of a connected and efficient home today!

- Nest Thermostat Fan Always On: Quick Fixes & Tips - September 1, 2024
- How Much to Install a Nest Thermostat? Smart Savings! - August 31, 2024
- Reset Nest Thermostat for New Owner: Quick Setup Guide - August 30, 2024